Monday, October 31, 2011

Peanut Butter Cheese Ball


  • 1 package cream cheese, room temperature
  • 3/4 cup creamy peanut butter (I used JIF)
  • 1 cup powdered sugar
  • 2 Tbsp packed brown sugar
  • 1 bag mixed peanut butter and chocolate chip morsels (I used Nestle Tollhouse)
  • apples, graham crackers or other desired serving snacks

Beat sugars, cream cheese and peanut butter in large mixing bowl until well blended.


Spoon mixture onto large piece of plastic wrap.  Pull up corners and twist together, forming a ball.  Freeze for at least 90 minutes.


Pour bag of morsels onto flat surface.  Unwrap ball and roll in morsels.  Press morsels by hand into ball if needed.  Cover and refrigerate until ready to serve.


My peanut butter addicted family seemed to enjoy this.  The graham crackers were preferred to the apples for most.  I accidentally left mine in the freezer for 5 hours before adding the morsels, but it was still quite pliable and easy to work with.  I made this a day before the party and kept it in the fridge.  It stayed very soft.  I believe I could have kept it in the freezer up until the point of serving and still had a good dessert.  It's definitely something you can make ahead of time.  Enjoy!

Stephee


Saturday, October 22, 2011

Honey Sesame Chicken & Fried Rice


I adapted a Honey Chicken Recipe and a Fried Rice Recipe to what ingredients I have on hand at home.  The only things I purchased that I don't normally have crammed in a pantry are the sesame seeds and the rice vinegar.  But, I love toasting sesame seeds and adding them to coleslaw and other recipes so I'll use them.  I'm sure I'll make this honey glaze again, so the vinegar isn't a bust either.  Now, here is my adaption of the recipes.


SESAME CHICKEN

Chicken Ingredients
  • 1 c flour
  • 2 tsp garlic salt
  • 1 tsp onion salt
  • 1/4 c cornstarch
  • 1 c milk
  • 1 lb chicken breasts, cut into 1" pieces
Combine dry ingredients.  Dip chicken into milk, then into dry mix and deep fry at 350 degrees for about 2 minutes, or until pieces float to top of oil.  Drain on paper towels.


Sauce Ingredients
  • 1/2 c water
  • 1 tsp rice vinegar
  • 1 tsp cornstarch + 1 tsp water mixed
  • 1 tsp ground ginger
  • 1.5 Tbsp minced garlic
  • 2 Tbsp oil
  • 1/4 c honey
  • sesame seeds

Heat oil in wok or nonstick pan over medium heat.  Add ginger and garlic and saute for 30 seconds.  Add honey, vinegar and water.  Add in cornstarch mix.  Simmer for 2-4 minutes, or until sauce begins to brown. Pour over chicken and mix.  Garnish with sesame seeds.  


FRIED RICE
  • 4 c cooked cold white rice  (if it isn't cold, it makes it sticky and gooey)
  • 2 Tbsp onion flakes
  • 3 Tbsp soy sauce
  • 2 large eggs
  • 4 Tbsp oil, divided
  • parsley leaves to garnish
Heat 2 Tbsp of oil in wok or nonstick pan.  Add eggs and scramble.  Remove eggs and wash out pan.  Heat remaining 2 Tbsp oil.  Add rice and mix with wooden spoon to prevent clumping.  Heat for about 3 minutes, then add onion flakes and soy sauce.  Heat for additional 2 minutes.  Add eggs and parsley and mix in pan.  Serve hot.


Though the fried rice is a basic recipe, it's not great.  The chicken was quite good and was a major hit with both my kids and my husband.  That is a rare event for me to please them all.  I told my husband next time I wanted Sesame Chicken, we were going to our favorite Chinese restaurant because this took too long.  But since I have done it, I think should I choose to try it again, I'll sail through it in half the time.  I can't say I'll try the rice again though.  I'll stick to a seasoning packet suggested by my sister next time I feel the need to make Chinese at home.  I'm having flashbacks of my homemade egg rolls now.  My kids loved them, but they were a PAIN to make.  Sometimes  I think takeout is okay.

Stephee 


Wednesday, October 19, 2011

Chicken & Dumpling Pocket Casserole


This has been a week full of testing recipes I found on Pinterest.  Earlier this week I tried Pilsbury Garlic Butter Crescent Rolls in a pizza bite recipe.  I bought the same flavor for this test recipe.  The pockets have a bit of a crunch where they are browned, but a chewy dumpling-like texture where they cooked in the soup mixture.  Inside is almost like a pot pie, minus the vegetables.  Here is what I did:


Ingredients


Soup mixture

  • 1 can cream of chicken soup
  • 1/2 c shredded cheese
  • 1/2 c milk
Filling
  • 2 c shredded chicken
  • 4 oz cream cheese, softened
  • 3 Tbsp butter, softened
  • 1/2 tsp paprika
  • 1/2 tsp chili powder
  • 1 tsp onion salt
  • salt and pepper to taste
  • 2 tsp parsley flakes
  • 1/2 tsp garlic salt
  • 2 tsp milk
  • 1/2 c shredded cheese

Beat cream cheese and butter until smooth.  Add all herbs and spices and beat.  Add milk, using more or less depending on consistency.  You want it to be thick enough to spoon, but not thing enough to be drippy.


Add cream mixture to prepared chicken and add shredded cheese.  Mix well, and set aside.  Prepare soup mixture with ingredients listed.  It does not need to be heated, just mixed well. 


Roll out dough, pressing together the seams of 2 triangles to form a square.  Top each square with a heaping spoonful of chicken mixture.


Fold dough over mixture, then turn over and press down slightly to  form the pockets.


Spray 13x9 casserole dish with nonstick cooking spray.  Pour half of the soup mixture into the dish.


Place pockets in pairs into the dish.  Pour remaining soup mixture over pockets.


Bake at 350 degrees for about half an hour.  If desired, during the last 10 minutes of cooking, sprinkle 3 Tbsp of Italian seasoned breadcrumbs over pockets for a bit of a crunch.


These turned out to be very flavorful since I used the garlic rolls.  I think they would have been better with just regular crescents.  The filling packs a lot of creamy flavorful punch in a small bite.  The kids weren't very much into this dish, but they have never been fans of pot pie or dumplings.  This recipe is a combination of the two.  But for those of us with a taste for more than ketchup covered fried foods, these are a very comforting cold weather meal.  Enjoy!

Stephee


Tuesday, October 18, 2011

Make your own Febreze!

I'm not posting a photo, you know what Febreze looks like.  My cousin repinned this tip on Pinterest today.  I simply had to try it.  I love Febreze.  I hate paying up to $5 for a bottle of scented water though.


  1. Open empty Febreze bottle.
  2.  Add 1/8 c of your favorite fabric softener, 2 Tbsp baking soda, and fill with HOT water.
  3.  Put top back on bottle and shake.
You have your own bottle of homemade fabric refresher.  I just did it.  It's awesome.  Depending on your fabric softener, you may want to add a little more.  Some scents are stronger than others.  I used Gain Island Fresh.  It's not a very concentrated softener, so it's not too thick.  I could probably have used a little extra.  But I like my Febreze to be strong.  If you use an inexpensive, watery brand you may want to double up to 1/4 cup. 

I will NOT be buying another bottle of fabric refresher ever again.  As a matter of fact, when I get my next bottle of fabric softener in my preferred scent, Apple Mango Tango, I'll probably dump out my other bottle of store bought refresher and replace it!

Stephee

Monday, October 17, 2011

Pepperoni Pizza Pockets


As you can see, I played around with the shape of my crescent rolls when making these.  I couldn't take another frozen pizza.  My girls were browsing through my recipes with me, and we saw one for pizza bites.  It was supposed to be canned biscuits cut up, rolled in cheese and pepperoni, and then baked.  While I was picking my crescent roll dough for another recipe, I saw Pilsbury has garlic butter flavored rolls.  Sounds perfect for pizza rolls to me!  So, the following is what ended up being created in my kitchen tonight.


Ingredients

  • 2 cans garlic butter crescent rolls (regular flavor will work of course)
  • 1 c Italian style panko bread crumbs
  • 1 package pepperoni, chopped
  • 1 c shredded mozzarella cheese
  • 0.25 c grated Parmesan cheese
  • handful of real bacon bits
  • 1 jar of pizza sauce

Directions


1. Preheat oven to 350 degrees.  Spray baking sheet with nonstick cooking spray.

2. Mix pepperoni, bacon pieces and Parmesan cheese.


3. Spread bread crumbs on a clean surface.  


4. Roll out dough onto crumbs.  If making pockets, press seams of two triangles together to form a square.  Otherwise, separate triangles and coat both sides with crumbs.


5. Top dough with pepperoni and mozzarella.


6. To form pockets, pull opposite corners together in the center, and press firmly to seal. To make a stuffed pizza slice, add a second piece of dough and pinch together seams.  For crescents, simply roll.


7. Bake until dough browns, approximately 20 minutes.  Serve with pizza sauce.


I tasted these, and they were fantastic.  They smell delicious when you are preparing them, so if you aren't hungry when you start you should be by the time you are finished.  It only took me about half an hour to get everything done, including clean up.  These are much better than a frozen pizza or a frozen pizza pocket.  It's a tie with our homemade pizzas though.  The panko crumbs add a crunch to the soft dough, so don't leave those out if you can help it.  I hope you try these and enjoy them.  I have 2 more cans of the garlic butter crescents to use for tomorrow's experiment which will include chicken and cream cheese.  Stay tuned!

Stephee

Tuesday, October 11, 2011

Mexican Corncakes


I recently became addicted to a show called Diners, Drive-In's and Dives on Food Network.  Guy went to a little place serving up some of the most delicious looking food one day.  It was all Venezuelan food.  The next show had a similar restaurant and focused on a dish called pupusas.  For some reason I have not been able to get what I imagine these things taste like out of my mouth or my head.  I've looked up recipes, including the one on Guy's website.  Unfortunately, getting any kind of "special" ingredients is hard where I live.  I'm looking at a one hour commute for some of these items.  For a girl on a tight budget, it's not plausible.  Sticking to the my-palate-craves-all-things-spicy frame of mind last night, I wandered into the kitchen and stared at my pack of chicken tenderloins.  After about 20 minutes (not counting the half hour spent uselessly searching Google for "easy chicken recipes") I just started pulling things out of the pantry.  I warned my husband I was going to experiment, and he was free to have 911 on standby or to come watch.  He didn't watch.  Things turned out well.  My kids ate their vegetables and "pancakes" as they called them.  I might have had a bit more of a response had they actually been covered in syrup.  But they cleared their plates, eating things they normally don't eat.  So here goes the thrown together recipe.

Corncakes

  • 1 packet cornbread mix
  • 1 tsp garlic salt
  • 1 tsp onion salt
  • 1 tsp parsley flakes
  • 1 tsp cilantro flakes
Prepare cornbread mixture according to packet.  I used white cornbread mix.  Stir in seasonings.  Heat skillet on medium high heat with and spray with nonstick spray.  Pour in 1/4 of the batter.  Heat until the edged begin to bubble, just like a pancake.  Flip.  Heat for 2-3 minutes.  Continue with the remaining batter.


Toppings

  • 4 chicken breasts
  • 1 packet fajita seasoning
  • shredded Colby jack cheese
  • 1 can pinto beans
  • 1 can whole kernel corn
  • 1 can diced tomatoes
  • sour cream
  • parsley flakes
  • cilantro flakes 
Dice chicken breast and prepare according to direction on fajita seasoning packet.  Once chicken is prepared, heat beans and corn.  Build corncakes with toppings as follows: cheese, beans, chicken, corn, tomatoes, sour cream, parsley, cilantro.


Monday, October 10, 2011

Easy Garlic Bread


  • 1 loaf French bread, sliced
  • 3/4 c butter or margarine
  • 1.5 tsp garlic powder
  • 0.5 tsp onion powder
  • 1 tsp parsley flakes
Heat oven to 350 degrees.  Combine butter, garlic, onion, and parsley flakes in microwaves safe container.  Heat for 1 minute, or until butter is completely melted.  Spoon mixture over slices of bread and spread across tops evenly once.  Once all slices have been topped, pour remaining butter mixture all around.  Bake until the outside crust browns and is crisp to touch, or about 20 minutes.  If desired, sprinkle on a bit of cheese the last 5 minutes of baking.


Wednesday, October 5, 2011

Cupcakes!


Cupcakes seem to be all the rage these days.  I haven't caught on to why exactly that is.  Maybe because they are small and cute, like a puppy.  I'm not sure.  I know my family had a brief affair with the insanity.  Even making special trips with a car load of children to run in and buy a high priced confection just to drive all the way back home to eat it.  By special trip I mean a good 45 minute to one hour drive, one way.  We even attempted to mix a makeup party and cupcake party.  Get pretty, eat pretty.

Unfortunately, an illness prevented the party from taking place after all of our researching, shopping, and baking.  And let me tell you, there are MANY different cupcake recipes floating around out there.  It's no longer mixing up your favorite cake mix and dumping it into muffin cups.  NO WAY!

I've admitted my new found obsession with Pinterest in a previous post.  While wasting a few hours researching ideas for a new post today, I saw a cupcake photo.  I wanted to dismiss it because I am just plain sick of the hype.  But I realized they were kind of ugly.  So I clicked.  I'm intrigued.  It takes me to a place where Ming Makes Cupcakes.  Not only does Ming make them, Ming doesn't bother to give them fancy names.  They have numbers.  You have 33 unique cupcake recipes to look through and possibly try.  What's even better is they look like anyone can make them.  They don't have an ingredient list longer than your femur.  Most cupcake recipes online come with a photo that makes you already feel defeated.  Not Ming's.  I'm going to pick a few and try them.  With the holidays approaching, I may be taking cupcakes to gatherings as a treat.

I cannot decorate a cake, a cupcake, or a pancake.  My mother and my sister can.  I used to skip anything that was pretty thinking I couldn't make it pretty, so why try.  But don't feel that way.  Appearance and taste are two different things.  In most cases.  My desserts are usually ugly, but they are delicious.  If my dessert is attractive, I either paid for it, or forgot a key ingredient.  With one exception.  The cupcakes I made for our party that went bust.  I mixed and matched cupcake and frosting recipes, and had some very cute liners.  I'll share photos and the recipes a below.  I used what I had at home, which was Nutella and basic pantry ingredients.  I don't keep decorating tools, and I used a freezer bag to ice the cupcakes.  See, we can all be creative and pop out something tasty and pretty!


Stephee's Nutella Cupcakes


Buttercream Frosting Ingredients
  • 3/4 c Nutella
  • 1/4 c butter, softened
  • 1 box powdered sugar
  • 1 tsp vanilla
  • 3-4 Tbsp milk
Beat Nutella and butter for 5 minutes.  Add vanilla, then alternate between adding powdered sugar and milk.  You may need to refrigerate the buttercream before piping for best results.  Milk can be substituted with heavy whipping cream.

Cupcake Ingredients
  • 1  3/4 c flour (I use self rising with no trouble on this recipe)
  • 1  1/4 sticks, or 10 Tbsp butter, softened
  • 3/4 c sugar
  • 3 large eggs
  • 1 tsp vanilla
  • 3/4 c milk
  • 1 jar Nutella
Preheat oven to 325* and line muffin pan with liners.  Using a mixer, cream butter and sugar together for about 3 minutes.  Add eggs one at a time, beating after each addition.  Add vanilla, then flour.  Mix everything EXCEPT NUTELLA until well blended.  The mixture will be thick.

Use an ice cream scoop and fill the liners with the batter, about 3/4 full.  Top each cupcake batter with a dollop of Nutella.  I used about 2 Tbsp, though the recipe called for 1/2 tsp.  Trust my dollop.  Use a toothpick and try to swirl the Nutella into the batter.  Nutella is thick and it's not going to give much, so it's okay.  Just spread what you can.

Bake for 20 minutes.

You can serve these without the buttercream, as a self frosting cupcake.  I like them that way.  But I was shooting for fancy so let's keep going.

Allow cupcakes to cool.  Prepare buttercream (or take out of fridge).  If you have all the fancy tools, go crazy and pipe away.  Me.  I don't.  I pulled out my Ziploc freezer bag, filled it with the frosting, cut off a corner, then I piped on the frosting.  I also had some pretty sugar crystals leftover from a birthday party and some Hazelnut Lindor truffles in my pantry.  I said I was trying to be fancy.  So I topped my buttercream with some sprinkles and a truffle.

No one got to eat my fancy, pretty cupcakes except my 8 and 10 year old daughters.  They enjoyed them immensely.  I shared the photos on my Facebook page because they were pretty for me.  I'm not into the cupcakes myself.  I don't care for the frosting.  But I tasted  the cake and it was very, very good.  So TRY IT!
Before Frosting
After Frosting

Monday, October 3, 2011

Rad Roasted Red Salsa


  • 6-8 tomatoes
  • 1 yellow onion
  • 1 bunch cilantro
  • 1 Serrano pepper
  • 1 jalapeno pepper
  • 1 lime
  • 1 tsp sugar
  • 1 Tbsp chopped garlic

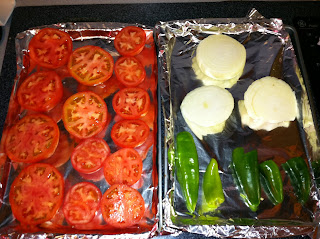
This was a learn-as-you-go recipe, so you see more peppers in my photo than I include in the ingredients.  Serrano peppers are very spicy so you should wear gloves and be very careful with them.  If you like very spicy salsa, add more.  I took out the seeds of my peppers prior to roasting.

Preheat oven to 375*.  Line baking sheets with foil.  Half tomatoes and onion.  Cap peppers, and remove seeds if desired.  Bake for approximately 45 minutes, or until onions are translucent and peppers begin to blacken.


Before Roasting

After Roasting
Mince cilantro and garlic together, and allow to rest.  See, even my daughter likes to help!  She loves using that Chop 'N Prep!
Lauren Choppin' and Preppin'
Combine all of your ingredients in your food processor or Quick Chef and blend to your desired consistency.  I prefer chunky salsa, so mine has lots of lumps.  But this will whip up into a very nice saucy salsa like you see at your favorite restaurant.


The flavor...A-M-A-Z-I-N-G!!!  So make it!  NOW!!!  And don't worry, if you can't find Serrano peppers, just plain old jalapenos will be fine.  This salsa is not going to last long.  Even my little one in the picture there, who doesn't eat salsa ever...she's eating this stuff.

Stephee


Saturday, October 1, 2011

My Herb Planters

I finally decided I was brave enough to try an herb garden.  Though garden is a big word.  I have 2 plants I brought home.  I didn't have any pots I liked so I looked around my kitchen for ideas.  I saw 2 empty glass containers that once went with a pizza stone set, that held spices and cheese.  Perfect!  The plants fit perfectly into the little glass vials.


Once I got them in I decided they looked a little plain and sad.  So I started to scour the kitchen for something to spoof them up.  Then I saw the fancy cupcake liners I bought.  The jars snapped into them as if they were made to fit together.  But something was still missing.  I found some beads, but they were too dark to see against the soil.  Then I found some ribbon.  I wound the ribbon around, used a bit of tape to secure it, and I have myself a couple of cute little planters.  Nothing fancy.  Nothing plain either.  Now let's hope my mint and cilantro stay alive!  And yes, my background is a piece of foil.  HAHA!  My family was very impatiently waiting for me to get out of their way so they could eat the steaks that just came off the grill.